%2B-%2B1.jpg)
%2B-%2B1.jpg)
%2B-%2B1.jpg)

%2B-%2B1.jpg)

New here? Subscribe to my free newsletters with my latest recipes!
If you give this recipe a try do leave a comment on this post down below and don’t forget to give it a star rating! It will really help more readers discover my recipes! Don’t forget to check out my latest videos on my YouTube channel. If you like what you see, do give me a thumbs-up (like), share & comment and subscribe to my channel so that the gods of YouTube (a.k.a algorithms) recommend my channel to a wider audience with similar tastes and more & more people can discover my videos!
And while you’re here, do follow me on Instagram, Pinterest, Facebook and Twitter. If you’d like to say hello or have detailed queries do send an email at ruchikrandhap@gmail.com. I’d love to hear from you!
Recipe for the dough adapted from food.com and recipe for the custard adapted from 350degreeoven.com
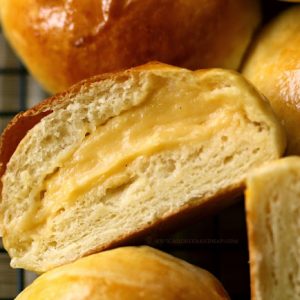
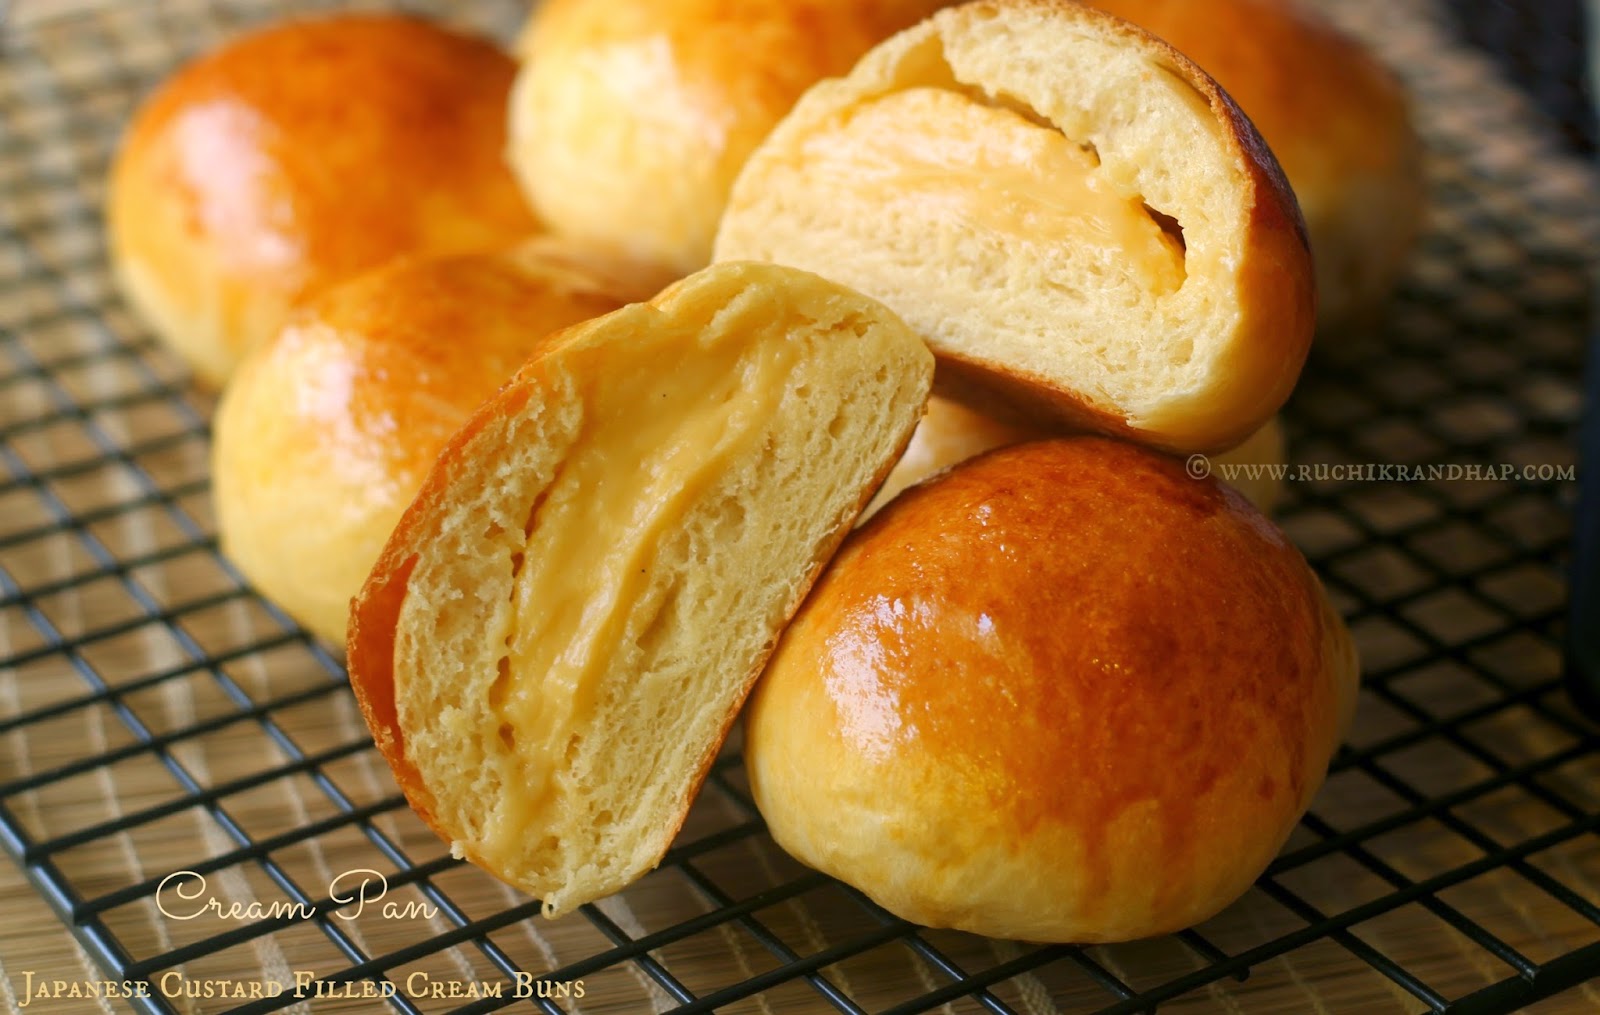
Cream Pan | Japanese Custard Filled Cream Buns
Ingredients
For the dough
- 2-1/2 cups (300 grams) bread flour (or all purpose flour/maida)
- 2 teaspoon instant yeast
- 4 tablespoons 60 grams caster sugar
- 3 tablespoons 45 grams butter
- 1/2 teaspoon salt
- 4 teaspoons (7 grams) milk powder
- 1 egg, lightly beaten
- 1/2 cup (125ml) milk
For the tangzhong
- 2 tablespoons+2 teaspoon (25 grams) bread flour (or all purpose flour/maida)
- 1/2 cup (125ml) water
For the custard filling
- 1-3/4 cups milk
- 4 tablespoons (60 grams) unsalted butter
- 4 egg yolks
- 1/2 cup caster sugar
- 5 tablespoons (40 grams) flour
- 2 tablespoons (15 grams) cornstarch (cornflour)
- 1/2 teaspoon salt
- 2 teaspoons vanilla extract or vanilla bean paste
For the egg wash
- 1 egg yolk beaten with 1 tablespoon water
Instructions
Make the custard
- Make the custard first as you need to chill it till it turns firm and easy to scoop. This could take at least 3 hours. By the time your dough is ready to be shaped, your custard will be too.
- Place the butter and the milk in a microwave safe bowl and heat it for 1-2 minutes or until the butter is melted completely.
- In another bowl beat the egg yolk lightly and add the flour, cornstarch, sugar and salt to it and whisk till you get a thick crumbly mixture. Add the melted butter+milk mixture little by little and whisk till you get a smooth, thick paste.
- Strain this egg+milk mixture into a saucepan (preferably non stick pan) to catch any lumps. Stir with a metal spoon until all the egg bits are smoothened and no lumps remain. Add the vanilla extract to the saucepan and cook it on a medium heat whisking continuously.
- The mixture will thicken in a few minutes – do not stop whisking until you see swirl lines appearing over the mixture. Remove from heat and continue whisking for another half a minute.
- Allow to cool a bit and then place contents in a box and refrigerate until required.
Make the tangzhong
- Gently heat the water for the tangzhong in a small saucepan and sprinkle the flour. On a moderate heat whisk the mixture till it thickens and swirl lines appear. Remove and cool completely. Keep aside until required. This recipe requires 1/2 cup of the tangzhong, refrigerate the excess (if any) for upto 3 days.
Make the dough:
- If you have a bread machine, use that (see note#3). Please note that kneading the dough by hand can be extremely messy initially as the dough is very sticky. Do not multitask if you are going to knead by hand.
- If you are going to knead by hand:
- Place the flour on a clean, large working surface. Add the prepared (and cooled) tangzhong and rub it until the mixture looks like breadcrumbs. Next add the rest of the dry ingredients mentioned under 'For the dough' and mix well. Now add the egg, butter and mix and add the milk in parts until you get a very sticky mixture. Resist the urge to use extra flour. Use a dough scraper to scrape the dough from sticking to the working surface and knead for 10-12 minutes continuously until the dough shapes up. Trust me, it can be very frustrating in the beginning but I promise you that as the gluten develops it will make the mixture less messy/sticky and you will get a nice, smooth dough.
- If you are going to use a bread machine: Follow the instructions on the manual of the bread machine
- If you are going to use the dough hook of your stand mixer (like KitchenAid/Kenwood): Add all the ingredients (for the dough plus the tangzhong) in one go and start the machine on medium speed – pause at intervals to scrape down the dough using a spatula. Continue for 10 mins or until all the flour/mixture has come together into a smooth dough
- You need to knead for a minimum of 8-10 mins or until you get a windowpane effect i.e when you stretch the dough and hold it against the light, the dough should be transparent enough to let the light in. When you have achieved this, the dough is ready for proofing.
- Place the dough in a warm spot, covered, till it doubles in volume. This could take about an hour and half. When the dough has doubled, punch it down and leave it to rise for another 30 mins.
Assemble & bake
- Line two baking sheets with baking parchment.
- Use the dough scraper or a knife to divide the dough into 16 equal parts. Divide the chilled custard cream into 16 equal portions using an ice cream scoop.
- Now take a portion of the dough and roll it into a smooth ball and stretch and flatten it slightly, big enough to place the scoop of custard in the middle. You can place the flattened dough over your 1/4 cup measure to make things easy for you.
- Now place the custard scoop in the centre of the dough and carefully pull the edges together and seal them.
- Place the buns seam side down on the baking sheets and cover with cling film/plastic wrap and allow to rise for another 30-40 mins.
- Preheat oven to 175 degrees C and brush the top of the buns with the egg wash.
- Bake for approx 12-15 mins or till the buns turn golden on top.
- Remove and cool thoroughly. Store in the refrigerator for upto 2 days. Do check for spoilage (as custard may go bad) after 2 days.
Notes
2. The longer you cool the tangzhong the better it is for the dough.
3. If you have a stand mixer (like KitchenAid or Kenwood) with a dough hook, use that. Just place all the ingredients in the bowl of the food processor and turn the machine on a slow speed for 10 minutes or till you get a smooth dough. If you have a bread machine, follow the instructions on the manual.
4. If you are hard pressed for time you can make the dough in advance and freeze it. Just thaw it on the counter and allow to rise for at least an hour before you are ready to bake.
Disclaimer
The nutritional values are only indicative.
What perfect looking buns and I'm dreaming about that soft custard filling squeezing out as I bite into one. It's like a hundred times better than a donut.
What beautiful buns, Shireen! They are perfectly round – and that custard filling looks divine. And the flag's pretty nice too. 🙂 How wonderful that you have help in both the eating and decorating departments in house.
@ Renee: Absolutely! They taste a lot better than donuts actually. You must give it a try! Thanks for the compliment Renee!
@ Stacy: Thanks so much!! It was such a great experience making these as I improved at the skill of shaping them perfectly – better than how I used to do earlier. Yeah, I do have help eating and presenting food at home, haha! I will pass on your compliment for the flag to my son 🙂
Rolled in panko and then deep fried?! Oh my goodness, you *have* to make that sometime! But these guys? Wowie! I love custard, and shoving it inside bread seems like a very good idea. I also like using the Tangzhong method, but you are so right–it gets major sticky and takes forever to knead. Great results though. Love the cream buns. =)
@ Jenni: Thanks!! Yeah, the Kare Pan is on my bucket list 🙂 I HAVE to make them someday soon!!
Very nice! I've never had a custard filled bun, but I agree with Renee that they look better than a donut!
Wow Shireen, these turned out perfectly and I love your little one's artwork and fan addition.
Shireen, these are gorgeous! I laughed when you wrote that you fell asleep thinking of how to improve your process of bread-making. You are not alone! I think the best baking ideas sometimes pop in my head when I am about to fall asleep too. Maybe we are most relaxed then and can actually think things through? Glad these worked for you the second time!
Those buns are picture perfect, I would love to try one! You couldn't find anything better in a bakery!! Nicely done!!
@ Adam: Thanks so much!! You must try these if you like custard 🙂
@ Wendy: Thanks so much!!
@ Holly: Thanks! So good to know that you dream of baking too!! Yes, when we are relaxed we are more likely to get better ideas..I like to have second chances sometimes 🙂
@ Tara: Thanks so much! Now that's a huge compliment!
Gorgeous buns!! And the custard looks delicious.
I love the tangzhong method! These look so good! Love the photos with the drawing too =)
Yum, these look great! I love pretty much anything with custard.
These buns look so delightfully soft! I'll definitely be trying this soon.
I love working with tangzhong starter — it makes the best bread in my opinion. Your cream pans look very tempting. Thank you for the detailed instructions.
I absolutely love custard and these filled rolls sound wonderful!
Looks delicious and i love that shine on top of the buns!! 🙂
I am drooling over this bread and will start dreaming of it too, until I make it.
Gorgeous bread, you have it there… I am sure, it must be too yummy …
loved reading the story of your process and what a delectable filling
LOVE custard… and bread!
Thanks so much everyone for your wonderful comments! 🙂
Can you replace the milk powder with milk?
This recipe already has milk, so if you don’t have the milk powder you could skip it
nice
@ Ali: Thanks!
This recipe is absolutely fantastic!! I made these yesterday and they came out perfect! They tasted great aswell !!!
@ Amelia: Thanks so much for your wonderful feedback! 🙂
This recipe is so good! I just made them and tried one fresh out of the oven and they taste and feel just like a doughnut! If you have the ingredients and the time, I would definitely suggest making these, I know I will again! Thanks so much for the great recipe. 🙂
Thank you so much for the positive feedback Tessa! I am so glad to know that you enjoyed these!
Hi Shireen,
I made them multiple times once again with variations in flavor and they turned out just as delicious! For one batch, I made a Kahlua/mocha custard, and for another I made an apple pie filling to go with the original custard recipe. They were absolutely to die for, everyone that tried them loved them so much! Again, I would highly recommend this recipe, it is, by far the best ‘custard bun’ I have ever had! Thanks so much for sharing it!
Hi Tessa,
Thank you so much for the wonderful feedback!! Your variations are making my mouth water! I hope to try the Kahlua custard version…wow! That sounds brilliant!! Thanks again for letting me know! Appreciate it!
Made these last weekend. Amazing. Custard was perfect! I did stir much longer than the recipe states. My only other issue was I went straight to the instructions for using a dough hook and it says add all the dough ingredients. Which actually didn’t say tangzhong so I didn’t add it. I also don’t have milk powder so looked up alternatives online. After review, it was included in the knead by hand part though but I never do that. Dough was of course dry so I added more milk. Amazing the dough turned out fantastic despite this major error.
I also did a short proof with the longer proof after the buns were made based on a different recipe.
Thanks for posting. I shared with Th neighbors and at work as I was very pleased with the outcome.
Thank you so much for the feedback! Yes, it is important to read the whole recipe. I had mentioned add all the ingredients. I have updated the ‘tangzhong’ part in the instructions for using the dough hook.Thank you for trying the recipe and I am glad that you were happy with the results!
Awesome Shireen
Thank you so much Rinku!
I made these yesterday , as my 21 year old daughter loves all cuisine that is Japanese , I think the end result was well received , I could not get my head round making a bun shape so I watched a tutorial and the lady made the shape at the end more like a pasty shape
Happy to hear that! Glad to know that your daughter liked it so much! Thanks for the feedback!
So yummy. Great texture. My tangzhong was a little lumpy and my dough did not have a windowpane appearance when stretched, but didn’t seem to matter! Great!
That sounds fab! Thanks for the great feedback Steph!!
Your recipe says 1-3/4 cups milk for custard. Is that 1 and 3/4 or 1 cup or 3/4 your choice? It’s not very clear.
It is 1 and 3/4th cups of milk. If it was 1 cup or 3/4th cup as a choice I would have mentioned it as “between 3/4th – 1 cup”
Thank you for asking!!! I had the same question!!
Hey can you freeze the leftover buns?
Hi, I have never done that but yes, it should be possible. You can thaw and use them
It doesn’t say what to do with the butter that’s under the dough ingredients. And I’m wondering if that’s either a mistake in the ingredient area or during the recipe’s making of the dough?
Thanks for letting me know, I have updated the recipe now. The butter needs to be added along with the egg and milk
I followed your recipe for these buns. Firstly, the custard filling is delicious but the proportion of custard to dough seems a bit too much custard for the amount of dough. However I found that your dough recipe seem to have insufficient proportion of flour. I mixed in stand mixer for 10 minutes and the dough was still very wet (clinging to the side of the mixing bowl). The wetness is a lot more than some of the other milk bread recipe I have used. I gradually added more flour and mixed another 10 minutes. Whilst I thought the dough still seemed wet, I went on to first proof. After 2 hours, the dough did double in size but then was still so wet that I kept adding more flour just so that it won’t stick to my hand when handling. I hand kneaded some more hoping to make the dough more smooth but it was still very sticky. At the end, I just proportioned into about 9 portions of around 75-80g each (so not the 16 portions you suggested as I think 16 would make the buns too small). I spooned about 35-40g filling per dough portion. The finished product was tasty and it puffed up nicely but the buns did not have a smooth top as the dough is too wet (I think). At any rate, feedback for your consideration.
Thank you for taking the time to share a detailed feedback. I made this years ago and remember that the dough was very tricky to work with but I had followed the recipe to the tee, resisted the urge to add any extra flour and I was rewarded with the most beautiful and delicious custard buns. I will definitely give this recipe a try again and share any additional tips or pointers.
I made these for a young man from Japan, who is going to college here. I made them according to directions and it turned out so good! He said they taste better than at home (they bake them longer so not as soft). He even sent pictures to his Dad.
*Do not add flour to the dough. When flattening the dough, lightly flour the surface and get both sides of the dough and flour your hands. Use a medium cookie scoop for the custard – it’s perfect. I’ll be making these again! Thank you!
Dear Julie,
Thank you so much for your lovely feedback! I am so happy to note that the young man from Japan liked these better that what is found back home! Thanks for taking the time to let me know
I made this recipe for a class party and everyone loved it! Two people even asked for this recipe – it felt good to share it with more people.
So happy to hear that Kalani! Thanks a lot for the feedback and for sharing the recipe with others!